|
Wed, 28 Feb 2001
Here are the pictures we promised. We recently got a digital camera so we should be able to send you pictures easier. The big open area is the liviing room. That is located just to the right of the entryway you see in the outside shot. Any questions send a note. Julie |
 |
Thu, 1 Mar 2001
Here are a couple more pictures. Unfortunately there are just the two of us working on this so the pictures will show one or the other of us. The painting one is me painting up a CCB triangle. The sawing one is Will rough cutting the struts for the AAB triangle. We will have more of putting them together in the next week. If there are specific shots you want let us know. Feel free to use them on the website. Julie |
   |
Sat, 3 Mar 2001
Here are the latest pictures. We were putting together AAB's today. The first picture (struts going together) is just us, doing just that. We match the struts up with a plywood template that is up on sawhorses so it is easier to get to. The second picture is Will putting in one of the screws for the horizontal stud. The two vertical studs are just in there for spacing at this point and the frame is not nailed to the plywood. We found we can connect the horizontal stud on one side and it makes it easier later in the assembling process. The last picture is of the vertical studs going in. You may also notice the horizontal stud is not at the 4 ft mark. We put it at the 3 ft mark instead because, as you know, at the 4 ft mark it would be only about 6 inches long. It seems to work. This is about all we have for variety of pictures for the next week or so until we start the next ones. Hope these are helpful! Julie |
  |
Mon, 5 Mar 2001
Just thought you would like to see our storage system. We we are using a car port tent to store our triangles. We have it sealed up to keep out the weather and hopefully the critters (there are several porcupines about that love plywood). We use our old truck to move the triangles from the trailer to the tent. The other man in the picture is my husband's father, Steve Covey. The dog is ours - a minature dachshund named Augustus, or Gus for short. Yes we have butterflies! We keep making the joke that we may live in a dome or a football, if it goes together wrong. Like the picture on the website, we have color coded all the triangles. Even the two opposite triangles are different colors. The corners are being painted as we finish them, before they go out for storage. That way we are working on only one type at a time. The color is on the inside edge so it doesn't show in the pictures. We have had a little trouble with the AAB's. For these we are using scraps from other triangles. Some of these scraps have been around for a month or two and have become more of a C shape than flat. It makes it interesting for cutting and laying out, especially with some of the struts not quiet being straight. We keep twisting, measuring and checking, so I hope they come out OK. I shall write if we have problems or have more pictures. Julie |
  |
Fri, 13 Jul
2001
James, Here are some pictures of what we have done so far. Right now we are going a little slower than we started because we are trying to figure out an efficient way to get the triangles up to the next level. If you have any suggestions, let us know. Julie and Will |

  |
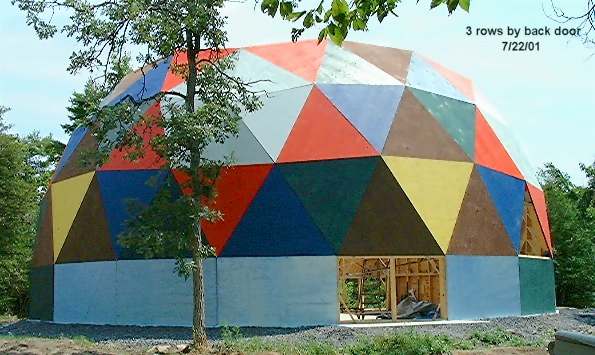
Hi James!
Well, we have been very busy the last few months. The downstairs walls are roughed in and the electrical is in as well. We just had the insulation put in (Icynene foam) and are having some difficulty with that contractor. The job was OK, but the WAY the job was completed was not. I am getting the company we worked through to sort it out. In this document and attached are some pictures I thought you might like to see. The roof is now completed (YEAH!) and here is a picture to prove it! |
  |
Here is the insulation company spraying in the Icynene in the small
bedroom over the entryway. Picture 1 is just after he sprayed it
on. Picture 2 was taken about 6 seconds later. Note the degree
of expansion!
Hope you enjoy the pictures. We will send more when we have them. Julie & Will |
 |
This is the front entryway back in November. Note the extent
of the roofing at that time. I just haven't had thought to take any
pictures of it recently.
Julie |